Microsoft Excel is a great interface for sharing and editing Primavera P6 data. I often send spreadsheets to clients for their input on data such as durations and budgets. For clients who do not own P6 or understand how to use it, Excel is an easy way to communicate changes. In fact, I typically request that my clients use spreadsheets to submit progress for updates; inputting progress manually inside P6 takes too long and introduces the possibility for errors.
It is very important to understand which data fields can be imported via Excel to avoid wasting time making changes in the spreadsheet. Thankfully, P6 will always warn us if we know where to look.
The quickest way to export P6 data to Excel is to right-click inside the Activity Table, which brings up the following menu:
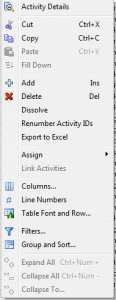
There are some limitations, however, to this export method. Some of these limitations are:
- All activities currently displayed in the Activity Table are exported; you must filter the activities in the Activity Table first to limit the number of activities being exported
- All columns currently displayed in the Activity Table are exported; you must change the layout to see other columns or to limit how many columns are exported
Note that Activity ID, Activity Status, and WBS Code are always exported regardless of whether they are currently displayed. This is because P6 needs these references for any changes you might want to import back into P6.
The image below shows some typical data fields displayed when exporting directly from the Activity Table to Excel:
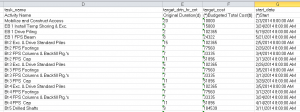
Here is how you can tell which data fields can be imported via Excel: data fields that have an asterisk (*) in the second row of the title can not be imported. In the above example Budgeted Total Cost has an asterisk. While this data can be exported directly from the Activity Table, any changes made to the budgets will not import. Similarly, changes can not be made to the Start or Finish dates; these are calculated fields. Activity Name and Original Duration, on the other hand, can be modified in Excel and the changes will import.
In the next example I am going to export P6 data using the spreadsheet template method. While this takes a little longer to set up, it offers the distinct advantage of allowing users to export:
- Activity Relationships
- Expenses
- Resources
- Resource Assignments
These are considered to be Subject Areas and each Subject Area will appear as a separate tab in Excel. More importantly, users can edit data in these tabs and import the changes back into P6. (There are some limitations to what type of data can be modified in which tabs that I will point out in a moment).
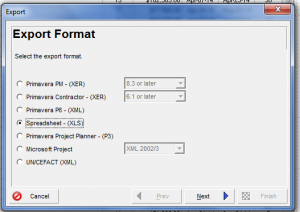
To create a spreadsheet template, select File > Export > Spreadsheet – (XLS):
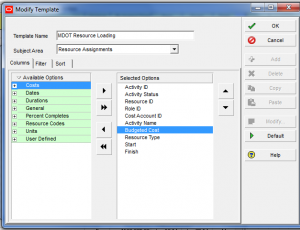
Because I want to edit budgeted costs for my activities I have chosen the Resource Assignments Subject Area during the export process, as seen below:
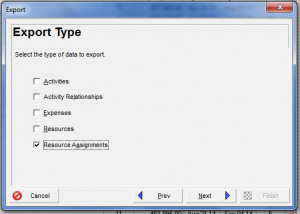
Budgeted units and costs can only be modified in the Resource Assignments tab in Excel. Resource Assignments can be displayed in the Activities tab but any modifications made to the budgets in this tab will not import.
In the next screenshot I have selected Budgeted Cost as a data field.Note that the data field does not mention the type of resource (labor, nonlabor or material) because each resource assigned to the same activity will appear on a different line in the spreadsheet. P6 therefore does not need to be told the resource type.
The final image shows the spreadsheet created by the template. This time there is no asterisk in the Budgeted Cost title, meaning this data can be modified and imported back into P6.
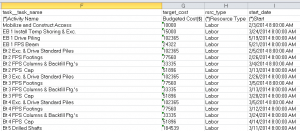
But notice what can not be edited – the Activity Name. The Activity Name can only be edited in the Activity tab (which I did not include in this template) or in the initial spreadsheet exported from the Activity Table. Every tab has some limitations in terms of what data fields can be imported. The Subject Area should be your first clue.
In any case, that little asterisk is a big help once you realize what it means!


Recent Comments